This guide explains the following topics:
- How to configure your virtual classroom settings and defaults;
- How to grant or deny speaking permissions to all users by default;
- How to enable or disable the live video in your virtual classroom by default;
- How to enable or disable the screen sharing tool in your live classroom;
- Locking / unlocking your virtual classroom;
- Disabling session recording;
The options and settings explained in this guide are only accessible by account admins. Some of the options are accessible by classroom moderators only if granted permissions.
Reaching the Virtual Classroom Default Settings
To access the classroom settings you must be logged into your Electa Live teacher account with admin privileges. Teachers who have no administrator privileges may only access classroom settings of classrooms to which they are set as default moderators.
To reach the classroom settings click on Management > Virtual Classrooms. Depending on the type of Electa Live account you have, there can be one or more virtual classrooms listed. Click the red options button next to the classroom you would like to manage. Then click Settings.
Teachers with administrator level of access can manage settings of all classrooms. If you are a teacher with moderator permissions you may only manage settings to classrooms to which you are set as a default moderator.
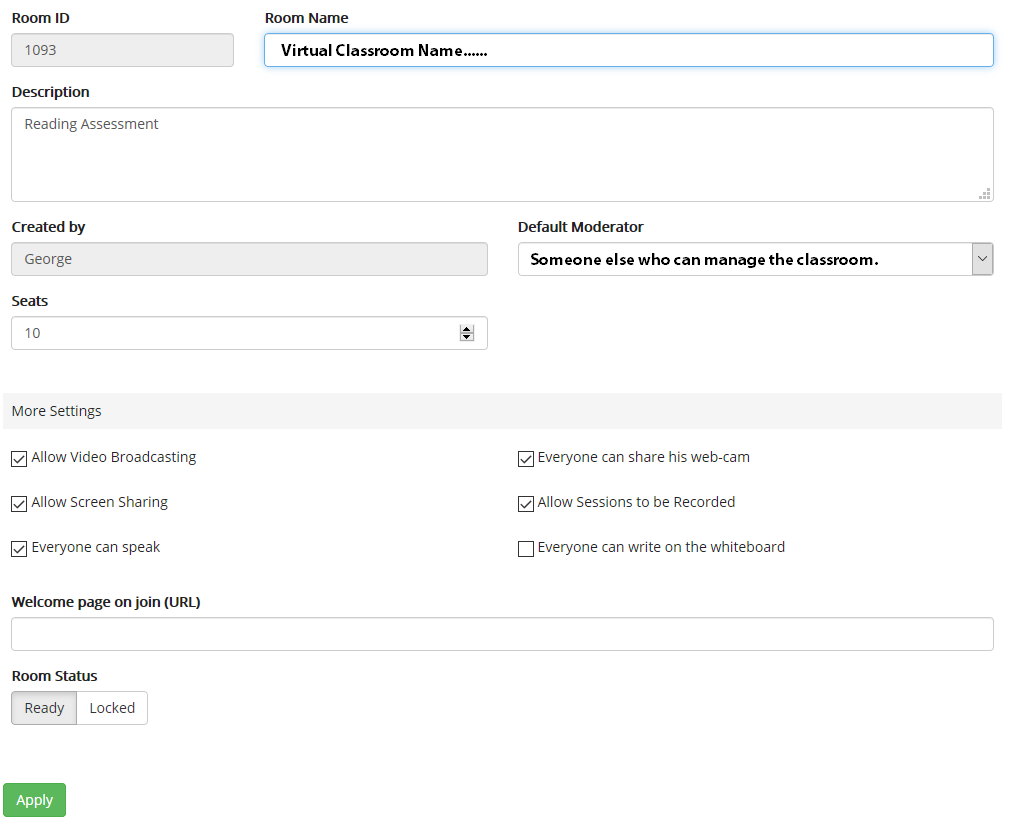
Settings a Classroom Name and Description
You can give your classroom name instead of the default one "Virtual Classroom". If you have multiple classrooms you may name them after your subjects or after your teachers. Actually you can follow any concept on classroom management to best match your virtual rooms specifics. For accounts with multiple classrooms it is a common approach to dedicate a classroom to each subject you teach or alternatively you may dedicate a classroom to each of your teachers.
The description is an optional short text that gives more details about your classroom.
The Room ID is an unique number automatically assigned to your classroom when created. This number cannot be changed.
Setting a Default Classroom Moderator
For each live classroom you can appoint one teacher (who is not an admin) to also manage the live classroom for you. This is suitable if you have an account multiple classrooms and multiple teachers. To set someone as a default moderator select their name from the drop-down list. This option does not apply if you run a single teacher account.
Default classroom moderators can change the classroom default settings (as explained below) as well as they can schedule live sessions in their classrooms.
In case you have multiple teachers who share one classroom it is advisable to appoint one of them as a default moderator to schedule live events for everyone else thus avoiding scheduling conflicts. In case you run an account with a limited number of teachers matching the number of classrooms you have, you may consider assigning a classroom to each of your teachers. To "give" a classroom to each teacher simply set the teacher as a default moderator.
Setting the Number of Seats
In most cases the number of seats that are available in your classroom is preset and cannot be changed. This depends on the type of license you have.
Default Settings for Audio, Video, Whiteboard access and Recordings
The default classroom settings apply to tools and their availability to students and teachers at time when they enter the live classroom.
The Live Video Tool
You can totally enable or disable the live video tool in your classroom through the option "Allow Video Broadcasting". When OFF the video button on the main toolbar will be disabled to for all attendees and teachers who enter the classroom. When ON the video tool will be available for all teachers. Students can share their webcams live if the option "Everyone can share his web-cam" is ON.
The Screen Sharing Tool
To disable the screen sharing tool for your teachers in this classroom turn off the option "Allow Screen Sharing". Respectively turn it ON if you want to enable the screen sharing tool in this classroom. This option applies to teachers. Students cannot directly initiate screen sharing unless this is requested by the teacher using the remote screen sharing tool.
Default Speaking Permissions
Teachers are always allowed to use audio communication in the live classroom. Students can activate their microphones only when speaking permissions are granted. To grant speaking permissions to all attendees by default turn on the option "Everyone can speak". If this option is off students who enter the live session will have their microphones disabled.
The option described here only affects the default microphone permissions for students who enter the classroom. Session moderators can grant or deprive microphone permissions to individual students using the classroom tools.
For live session with a lower number of students or small group discussions you may leave everyone allowed to activate microphones. For larger sessions however it is recommended to have this option off and only grant speaking access when needed.
Default Whiteboard Controls
By default students cannot write on the whiteboard or use the whiteboard tools. The default whiteboard access for all students is "view only". You can enable the whiteboard controls for all students who enter the classroom by turning on the option "Everyone can write on the whiteboard". We recommend keeping this option off for sessions with more attendees and only give whiteboard controls to everyone if really needed.
Individual whiteboard controls can be granted from the classroom interface by right-clicking on an attendee name.
Permissions to Record
All Electa Live classrooms have a built-in recorded tool which can be activated by the session moderator through a button on the main toolbar. In certain cases you may want to have the session recording option disabled for your teachers in one or more classrooms. To do that turn off the option "Allow Sessions To Be Recorded". This will disable the recording button thus for your session moderators in this classroom. Having the option "on" will enable the recording switch.
Please note that sessions are not recorded automatically. Teachers need to explicitly click the Rec button on the main toolbar (near the end of the toolbar) in order to turn on session recording.
Settings Welcome Page
You can set up a welcome web page to be opened for every person who enters your classroom. Learn how to enable a welcome page.
Locking Your Classroom
To lock/unlock a classroom for all users who have permissions to enter the classroom use the "Lock / Unlock" switch. Please note that locking the classroom will prevent any users who disconnect from your live session to re-enter even if the disconnection was accidental or as a result of an internet connectivity disruptions.
All changes made here are activated by clicking the Apply button. They affect users who enter the classroom and do not apply to users who are already in the classroom. Session moderators should use the in-classroom controls to manipulate access and permissions for people already in the classroom.
Video guide